Improper or incomplete preparation is a recipe for disaster. Fail to prepare, and your project is doomed before it has even begun.
The steps I’ve listed below are general, all-purpose prep rules. They are standard steps for most jobs. Before and after preparation, reassess the space to see if something does not look fully prepared.
Things You’ll Need:
•Roll of plastic sheeting
•Painter’s Tape
•Primer (Water-based Primer is usually sufficient)
•Spackling Compound
•Putty Knife
Clear the Room
Clearing the room of all possible obstacles is the first step toward a quality paint job. A cluttered room will increase the stress, work, and difficulty of your painting project.Begin by clearing the walls any removable pieces. This includes outlet covers, light switch covers, curtain rods, pictures, etc… Label any outlet covers and light switches with masking tape so they can find their proper home again. Keep the mounting hardware together (a plastic sandwich bag works great), labeled, and in a safe place.
Remove everything that’s possible from the room’s interior as well. Furniture, fabrics, home décor. Furniture that cannot be removed for some reason should be moved into the center of the room and covered with plastic sheeting. You should not use cloth to cover the floor or any furniture, as paint will soak into the fabric and stain whatever is underneath.
Clean the Room
Clean the room thoroughly. Vacuum carpets. Sweep and mop floors. Wipe down baseboards and woodwork with a damp cloth. Clean those pesky cobwebs from the corners.
Once this stage of cleanup is completed, cover the floor completely with plastic sheeting. Secure the sheeting to the edges of the floor or baseboard with painter’s tape.
Wash the Walls
Walls (even those that look clean) accumulate dust, oily buildup, soot (from candles, cigarettes, etc…). Washing the walls to be painted is a critical step in the preparation process. Paint will not adhere well to dirty, oily walls.
There are many cleaning products available on the market for this type of application, but I’ve found that plain old dish soap and warm water works just about as well as any of them. A sponge-headed mop is an excellent tool for actual cleaning. Its long handle should allow you to reach 8 or 9 foot tall walls with relative ease.
Once the walls have gotten a thorough washing, give them a final once-over with plain old water to wash any soapy residue from the surface.
Patch Holes
A smooth surface is critical to the finished look of your paint project. Fill any nail holes, small dents, and nicks in the drywall with spackling compound.
Press the spackle firmly into the hole with a putty knife and smooth as flat as possible. Allow several hours to dry (per spackling manufacturer’s instructions). Sand the repairs flush with the wall. Apply a second coat of spackling if necessary. Sand flush.
Spackling is meant only for minor drywall repairs, such as nail holes, hairline cracks, and small nicks. I urge you to contact a professional contractor/drywaller for any larger repairs, unless you are confident in your ability to handle it yourself. Drywall finishing is something of an art form (in my book at least) and I have encountered far too many botched do-it-yourself jobs to prescribe the “fix-it-yourself” method.
Priming
Once you have patched your walls, priming is the next step in preparing them for paint. Primer bonds to your current surface and gives you a perfect base to paint on. Primer may be unnecessary if you are using Latex Paint to paint over a previous low-gloss latex paint.
Even if your surfaces are already painted with a low-gloss, latex paint and do not require priming, you should apply primer to any areas that are patched with spackling. These areas will appear glossy even after painting if they are not spot-primed.
Taping
Taping is another necessary evil of preparing for paint. Taping off baseboards, woodwork, light switches, outlets, ceilings, adjoining walls, etc, is the best way to protect those surfaces you do not intend to paint.
Use only “painter’s tape”. It is blue and available at nearly any paint, home improvement, or hardware store. Any other tape may damage your surfaces when you attempt to remove it. Painter’s Tape is low tack and can usually be removed without incident within two weeks of application.
Taping can be very painstaking work. Apply it so the edge is flush against the surface to be painted, then press down along that border with a putty knife to seal the adhesive. This will help keep paint from seeping behind your tape.
Once you have finished taping off all areas, you are ready to begin painting. Take a deep breath. The hardest part is already done.
About Author:
Adam Smith is a professional painter and faux finisher. He also maintains a "how-to" website providing information on interior painting and faux finishing for do-it-yourselfers. You can visit it at http://www.how-to-faux-finish.com/
Video Painting Tips:
Bob Schmidt gives advice about painting products and procedures to make your painting project go more smoothly
 WallDreams Paint Ideas!
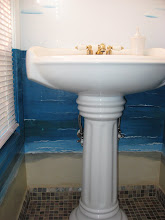
I like to spray prime the outlet covers and paint them separately in the faux finish being rendered unless the original color works well with the home interior. When doing a mural, sometimes I include the wall plate into the design as well.
My preferrence is to keep the work area clean during the entire process by keeping a trash bag/can nearby and picking up shrapnel as I go. It's safer, cleaner and less work to do when finishing up.
Pull tape as you go whenever possible! It's far easier to retape an area and you get a cleaner pull on the tape than if you let the paint dry on it. You can easily pull your paint finish right off the wall making for many touch ups later. While the paint is still wet any bleeding can be easily corrected.


No comments:
Post a Comment